Endpoints are a prime target for cyberattacks, making it crucial to efficiently handle and investigate alerts from your endpoint detection systems. This includes identifying threats that lurk in memory, such as fileless malware or malicious scheduled tasks created by attackers.
Intezer’s Endpoint Scanner is a robust forensics tool designed to detect advanced in-memory threats on Windows operating systems. It can identify malicious code injections, packed and fileless malware, and any unfamiliar code. Security teams can utilize the endpoint scanner on a single suspected endpoint, perform a sweeping scan across numerous endpoints in an environment, or have Intezer run a scan in response to an alert from EDR platforms like SentinelOne, CrowdStrike, or Microsoft Defender.
The endpoint scan results provide a wealth of information, including a file analysis summary, links to full analysis, file properties such as sha256, md5, and other hashes, process tree details, file paths where the file was located on disk, and creation timestamps for each file.

While the volume of information from an infected endpoint scan may seem overwhelming, knowing which details to focus on and how to leverage them for initial investigation and malware removal is essential. Where should you begin?
How to approach a malicious endpoint scan result
In this instance, Intezer identified that this machine was infected with Agent Tesla, as indicated by the classification on the top left:

On the main view, it’s evident that the machine was infected due to the originating file: andyzx.exe and the replaced memory process classified as Agent Tesla, a spyware Trojan developed for the .NET framework.

The initial focus should be on the file path and process id to pinpoint the threat on the machine for removal.
Subsequently, examining the process tree by clicking on the malware process or file can aid in tracing the running process and terminating it.

Next, investigate the downloaded link by accessing the file’s information. If a URL is detected, it should be blocked.

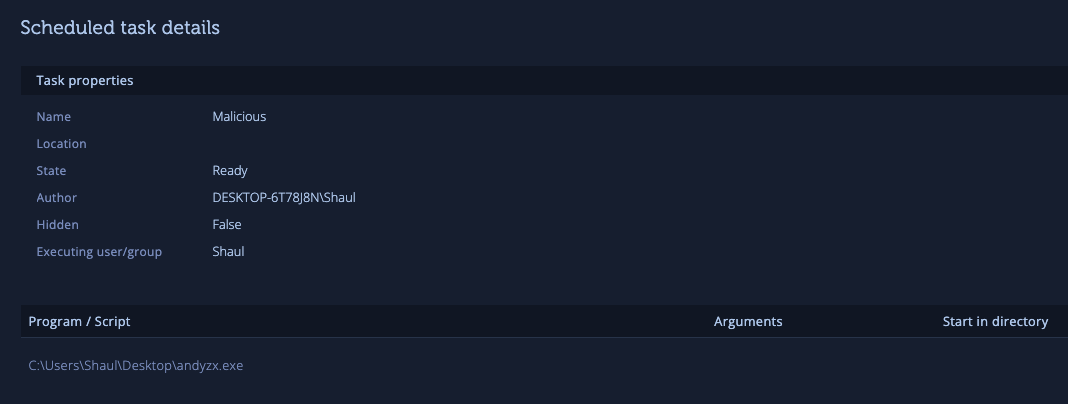
In certain instances, attackers may have set up a scheduled task, which can be found in the Scheduled Tasks tab:

This tab offers insights into all registered scheduled tasks on the endpoint, enabling the identification of suspicious scheduled tasks that could facilitate persistence by an attacker. (Note: Scheduled Tasks feature is supported in scanner version v1.0.1.12 and above, so ensure you have the latest version).
By clicking on a scheduled task, additional details like location, description, hidden status, and executing user/group are provided. Tasks can be searched, sorted, and filtered to quickly pinpoint and focus on potentially suspicious tasks.
Subsequently, search for the suspicious scheduled task by name on your machine and remove it.

By carefully examining details such as file paths, process trees, and scheduled tasks, we can pinpoint and terminate malicious processes, preventing future infections.
Protecting your environment from infected endpoints
By following the outlined steps, you can confidently address a malicious endpoint scan result and take the necessary actions to safeguard your system.
To obtain the latest version of our endpoint scanner, ensure you download it from the Endpoint Scanner page or initiate the scan from your endpoint security system.
The Endpoint Scanner is a feature included in Intezer’s Autonomous SOC plan. To learn more about how Intezer can automate alert triage, investigations, response, and hunting tasks for you, book a demo here.


